> ## Documentation Index
> Fetch the complete documentation index at: https://docs.ochy.io/llms.txt
> Use this file to discover all available pages before exploring further.
# API keys and webhooks
> Manage API keys from the dashboard, configure webhooks, and receive analysis updates on your server.
The Ochy web dashboard gives you a self-service interface to manage your API keys and webhook
configuration. You must have an **enterprise account** to access these features. Navigate to
**Channels > API** in the sidebar.
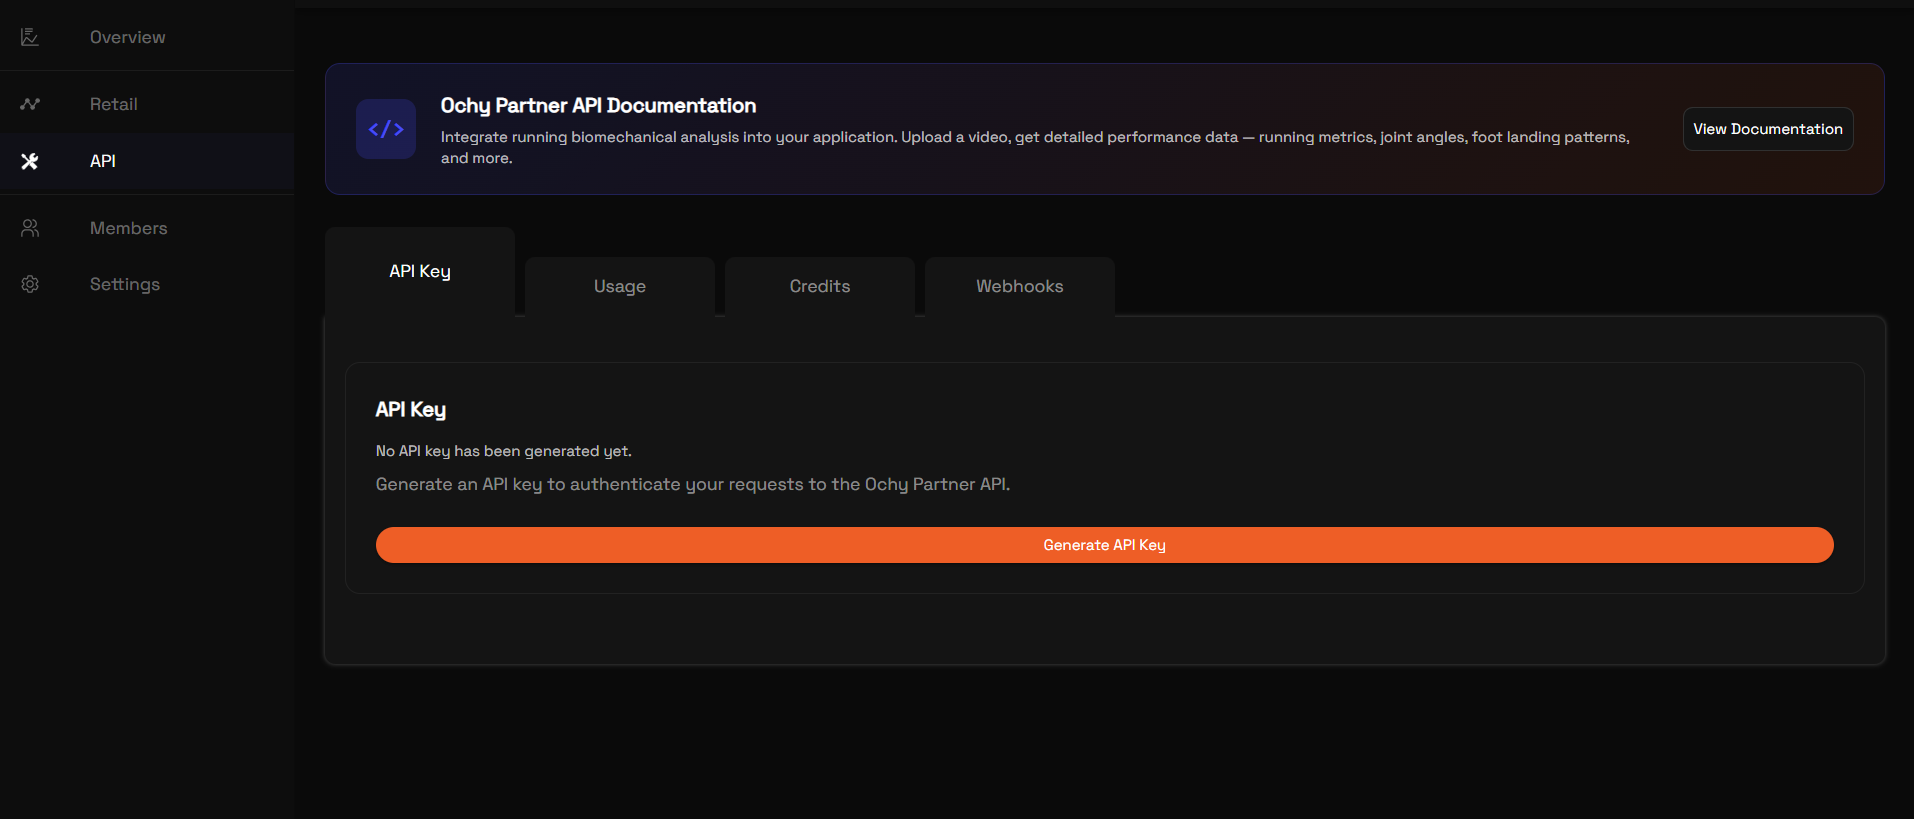 The page has four tabs: **API Key**, **Usage**, **Credits**, and **Webhooks**.
Only organization admins can generate, rotate, or revoke API keys and configure webhooks.
## API key management
Your API key authenticates every request to the Partner API. See [authentication](/authentication)
for how to pass it in your requests.
### Generate a key
If your organization does not have an active key yet:
Navigate to **Channels > API** in the sidebar, then select the **API Key** tab.
The dashboard creates a new key and displays it in an orange banner at the top of the page.
Click the copy icon to save the key to your clipboard. Store it in a secure location such as an
environment variable or a secrets manager.
The full key is shown only once, immediately after generation. If you navigate away without
copying it, you will need to rotate the key to get a new one.
### Rotate a key
Rotation revokes the current key and generates a replacement in a single step. Use this when you
need a fresh key without downtime between revoke and generate.
A confirmation dialog warns that existing integrations will stop working immediately.
The old key is revoked and a new key appears in the banner. Copy it before leaving the page.
Replace the old key in every service that calls the Ochy API.
### Revoke a key
Revoking permanently deactivates the key. Any request using the revoked key will receive a
`403 Invalid API Key` error.
A confirmation dialog explains that integrations using this key will stop working.
The key is deactivated. You can generate a new key at any time from the same tab.
## Webhooks overview
Instead of calling `GET /analysis/{analysis_id}/results` repeatedly, you can ask Ochy to **push**
status updates to an HTTPS endpoint you control. Your server receives JSON payloads as the analysis
moves from queued to running, through progress milestones, to success or failure.
Webhooks are optional. [Polling](/guides/analysis-workflow#polling-strategy) remains fully
supported for debugging, gradual rollouts, or when delivery issues occur.
The integration flow:
1. **Register a webhook URL** once for your partner account — from the dashboard or with
[`PUT /webhook`](/api-reference/webhooks/configure-webhook). Use
[`GET /webhook`](/api-reference/webhooks/get-webhook) to read the current URL, `enabled` flag,
signature status, and `updated_at`.
2. **Opt in per analysis** when you call [`POST /analysis/start`](/api-reference/analysis/start-analysis)
with `notify_via_webhook: true`. If you omit it or set it to `false`, no webhook events are sent
for that analysis.
3. **Optionally enable HMAC signatures** so your server can verify that events were sent by Ochy
and that the request body was not modified.
4. **Handle incoming POST requests** on your URL. Each payload includes an event type, status,
percentage, a monotonic `sequence` per analysis, and a timestamp.
Delivery is asynchronous: your endpoint should respond quickly (for example `2xx`) and process the
payload in the background if needed.
## Configure webhooks
You configure the webhook **once per partner**; you do not pass the URL on every
`POST /analysis/start`.
### From the dashboard
Navigate to **Channels > API** and select the **Webhooks** tab.
Provide an HTTPS URL where Ochy will send POST requests. For example:
`https://your-app.com/webhooks/ochy`.
Click **Save Webhook**. The webhook is enabled automatically.
The URL must use HTTPS. HTTP endpoints are not accepted.
Once configured, use the toggle switch to enable or disable delivery without removing the URL.
Click **Edit URL** to change the endpoint, then **Update Webhook** to save.
Click **Send Test Event** to send a sample payload to your endpoint. The dashboard displays the
HTTP status code and response latency so you can verify connectivity.
The test button is only available when the webhook is enabled. Toggle it on first if you need to
test.
### From the API
**`GET /webhook`** returns the stored `url`, `enabled`, and `updated_at` for your partner. If
nothing has been saved yet, the response body is an empty JSON object (`{}`).
```bash theme={null}
curl -s "https://partner-api.ochy-prod.com/webhook?apiKey=YOUR_API_KEY"
```
Use **`PUT /webhook`** with a JSON body:
```json theme={null}
{
"url": "https://client.example.com/webhooks/ochy",
"enabled": true,
"signature": {
"enabled": true
}
}
```
| Field | Type | Description |
| ------------------- | ------- | -------------------------------------------------------------------- |
| `url` | string | HTTPS URL that will receive `POST` requests from Ochy. |
| `enabled` | boolean | When `false`, no webhook traffic is sent until you enable it again. |
| `signature.enabled` | boolean | Optional. When `true`, Ochy signs webhook requests with HMAC-SHA256. |
A successful **`PUT`** returns the same shape as **`GET`**: `url`, `enabled`, and `updated_at`.
If you enable signatures for the first time, the response also includes a `signature.secret`.
Copy and store it immediately; it is not returned by `GET /webhook`.
Example response when a signing secret is generated:
```json theme={null}
{
"url": "https://client.example.com/webhooks/ochy",
"enabled": true,
"updated_at": "2026-06-29T13:25:17Z",
"signature": {
"enabled": true,
"algorithm": "HMAC-SHA256",
"last4": "n6p8",
"created_at": "2026-06-29T13:25:17Z",
"updated_at": "2026-06-29T13:25:17Z",
"secret": "YOUR_GENERATED_SIGNING_SECRET"
}
}
```
Store `signature.secret` securely. Ochy only returns the full signing secret when it is generated
or rotated.
When `notify_via_webhook` is `true` on start, the API checks that your partner webhook is valid
and enabled. The decision to send webhooks for that analysis is fixed at start time and stored with
the analysis.
## Start an analysis with webhooks
Add an optional field to the same multipart request you already use for `POST /analysis/start`:
| Field | Type | Default | Description |
| -------------------- | ------- | ------- | -------------------------------------------------------------------------------------------------------------- |
| `notify_via_webhook` | boolean | `false` | If `true`, progress and completion events are delivered to your configured webhook URL for this analysis only. |
Example (cURL):
```bash theme={null}
curl -X POST "https://partner-api.ochy-prod.com/analysis/start?apiKey=YOUR_API_KEY" \
-F "video=@runner_side.mp4" \
-F "analysis_type=side_view" \
-F "notify_via_webhook=true"
```
## Events and payload format
For each analysis, events are emitted when:
* processing **starts** (status moves to `analyzing`);
* **progress** crosses each **10%** boundary from 10% through 90% (if progress jumps, all crossed
milestones are sent in order);
* the analysis **completes** successfully (`success`, 100%);
* the analysis **fails** (`failed`), at any progress value.
| `event_type` | Typical `status` | Notes |
| -------------------- | ---------------- | ------------------------------------------------------------ |
| `analysis.started` | `analyzing` | First processing signal for the run. |
| `analysis.progress` | `analyzing` | Progress milestones at 10%, 20%, … 90%. |
| `analysis.completed` | `success` | Final success; `percentage` is 100. |
| `analysis.failed` | `failed` | Terminal failure; `percentage` reflects last known progress. |
Ochy sends **`POST`** requests to your webhook URL with a JSON body like:
```json theme={null}
{
"analysis_id": "abc123",
"event_type": "analysis.progress",
"status": "analyzing",
"percentage": 40,
"sequence": 5,
"timestamp": "2026-03-23T10:45:00Z"
}
```
| Field | Description |
| ------------- | ---------------------------------------------------------------------------------------- |
| `analysis_id` | Same identifier as `video_id` from the start endpoint. |
| `event_type` | One of `analysis.started`, `analysis.progress`, `analysis.completed`, `analysis.failed`. |
| `status` | Current analysis status (`analyzing`, `success`, or `failed`). |
| `percentage` | Progress from 0 to 100. |
| `sequence` | **Per-analysis** monotonic counter. Use it to order and deduplicate events. |
| `timestamp` | Time of the event in UTC (ISO 8601). |
**Completed:**
```json theme={null}
{
"analysis_id": "abc123",
"event_type": "analysis.completed",
"status": "success",
"percentage": 100,
"sequence": 11,
"timestamp": "2026-03-23T10:46:30Z"
}
```
**Failed:**
```json theme={null}
{
"analysis_id": "abc123",
"event_type": "analysis.failed",
"status": "failed",
"percentage": 60,
"sequence": 7,
"timestamp": "2026-03-23T10:46:30Z"
}
```
## Verify webhook signatures
Webhook signatures are optional but recommended for production integrations. Enable them from the
dashboard or with `signature.enabled: true` in `PUT /webhook`. When signatures are enabled, Ochy
adds two HTTP headers to every webhook request:
| Header | Description |
| ------------------ | -------------------------------------------------------------- |
| `X-Ochy-Timestamp` | Unix timestamp in seconds, generated when the request is sent. |
| `X-Ochy-Signature` | Hex-encoded HMAC-SHA256 signature. |
The signed value is:
```text theme={null}
.
```
To verify a webhook:
1. Read the raw request body bytes exactly as received.
2. Read `X-Ochy-Timestamp` and `X-Ochy-Signature`.
3. Reject old timestamps (for example, more than 5 minutes away from your server time).
4. Compute `HMAC-SHA256` with your webhook signing secret over `.`.
5. Compare the expected signature with `X-Ochy-Signature` using a constant-time comparison.
Do not parse and re-serialize the JSON before verifying the signature. JSON whitespace or key
ordering changes will produce a different signature. Verify against the raw request body.
### Python example
```python theme={null}
import hashlib
import hmac
import time
def verify_ochy_webhook(secret: str, timestamp: str, signature: str, raw_body: bytes) -> bool:
# Reject replayed requests. Adjust the tolerance to your infrastructure.
if abs(time.time() - int(timestamp)) > 300:
return False
signed_payload = timestamp.encode("utf-8") + b"." + raw_body
expected = hmac.new(
secret.encode("utf-8"),
signed_payload,
hashlib.sha256,
).hexdigest()
return hmac.compare_digest(expected, signature)
```
### Node.js example
```js theme={null}
import crypto from "crypto";
function verifyOchyWebhook(secret, timestamp, signature, rawBodyBuffer) {
const ageSeconds = Math.abs(Date.now() / 1000 - Number(timestamp));
if (ageSeconds > 300) {
return false;
}
const expected = crypto
.createHmac("sha256", secret)
.update(`${timestamp}.`)
.update(rawBodyBuffer)
.digest("hex");
return crypto.timingSafeEqual(
Buffer.from(expected, "hex"),
Buffer.from(signature, "hex")
);
}
```
## Rotate the signing secret
Use **`POST /webhook/signature/rotate`** to generate a new signing secret:
```bash theme={null}
curl -X POST "https://partner-api.ochy-prod.com/webhook/signature/rotate?apiKey=YOUR_API_KEY"
```
The response includes the new `secret` once:
```json theme={null}
{
"enabled": true,
"algorithm": "HMAC-SHA256",
"last4": "7Tq2",
"created_at": "2026-06-29T13:25:17Z",
"updated_at": "2026-06-29T14:10:00Z",
"secret": "YOUR_NEW_SIGNING_SECRET"
}
```
Update your webhook receiver to use the new secret.
## Ordering and out-of-order delivery
Webhook delivery is asynchronous. In rare cases an older event might arrive after a newer one.
* Each payload includes a **`sequence`** that increases for that `analysis_id`.
* **Process events in `sequence` order**; if you receive a payload whose `sequence` is less than or
equal to the last one you applied for that analysis, you can **ignore** it.
Ochy also uses internal ordering so that events for a given analysis are published in sequence;
this reduces but does not eliminate the need for client-side ordering using `sequence`.
## Fallback: polling
You can always call:
```
GET /analysis/{analysis_id}/results
```
This endpoint continues to return the current status and percentage (and full results when
`status` is `success`), whether or not webhooks are enabled. Use it for integration testing,
manual checks, or when you need a single source of truth after delivery issues.
## Usage and credits
The remaining two tabs on the API page provide monitoring:
* **Usage** — view your API request history and consumption patterns.
* **Credits** — check your remaining analysis credits. Each analysis consumes one credit when
started (see [authentication](/authentication#credits)).
To add credits, contact sales through the [Ochy website](https://www.ochy.io) or from your account.
## See also
* [Analysis workflow](/guides/analysis-workflow) — video requirements, status codes, and polling
* [`GET /webhook`](/api-reference/webhooks/get-webhook) — read current webhook settings
* [`PUT /webhook`](/api-reference/webhooks/configure-webhook) — register or update your webhook URL
* [`POST /webhook/signature/rotate`](/api-reference/webhooks/rotate-webhook-signature) — rotate your webhook signing secret
* [`POST /analysis/start`](/api-reference/analysis/start-analysis) — `notify_via_webhook` field
The page has four tabs: **API Key**, **Usage**, **Credits**, and **Webhooks**.
Only organization admins can generate, rotate, or revoke API keys and configure webhooks.
## API key management
Your API key authenticates every request to the Partner API. See [authentication](/authentication)
for how to pass it in your requests.
### Generate a key
If your organization does not have an active key yet:
Navigate to **Channels > API** in the sidebar, then select the **API Key** tab.
The dashboard creates a new key and displays it in an orange banner at the top of the page.
Click the copy icon to save the key to your clipboard. Store it in a secure location such as an
environment variable or a secrets manager.
The full key is shown only once, immediately after generation. If you navigate away without
copying it, you will need to rotate the key to get a new one.
### Rotate a key
Rotation revokes the current key and generates a replacement in a single step. Use this when you
need a fresh key without downtime between revoke and generate.
A confirmation dialog warns that existing integrations will stop working immediately.
The old key is revoked and a new key appears in the banner. Copy it before leaving the page.
Replace the old key in every service that calls the Ochy API.
### Revoke a key
Revoking permanently deactivates the key. Any request using the revoked key will receive a
`403 Invalid API Key` error.
A confirmation dialog explains that integrations using this key will stop working.
The key is deactivated. You can generate a new key at any time from the same tab.
## Webhooks overview
Instead of calling `GET /analysis/{analysis_id}/results` repeatedly, you can ask Ochy to **push**
status updates to an HTTPS endpoint you control. Your server receives JSON payloads as the analysis
moves from queued to running, through progress milestones, to success or failure.
Webhooks are optional. [Polling](/guides/analysis-workflow#polling-strategy) remains fully
supported for debugging, gradual rollouts, or when delivery issues occur.
The integration flow:
1. **Register a webhook URL** once for your partner account — from the dashboard or with
[`PUT /webhook`](/api-reference/webhooks/configure-webhook). Use
[`GET /webhook`](/api-reference/webhooks/get-webhook) to read the current URL, `enabled` flag,
signature status, and `updated_at`.
2. **Opt in per analysis** when you call [`POST /analysis/start`](/api-reference/analysis/start-analysis)
with `notify_via_webhook: true`. If you omit it or set it to `false`, no webhook events are sent
for that analysis.
3. **Optionally enable HMAC signatures** so your server can verify that events were sent by Ochy
and that the request body was not modified.
4. **Handle incoming POST requests** on your URL. Each payload includes an event type, status,
percentage, a monotonic `sequence` per analysis, and a timestamp.
Delivery is asynchronous: your endpoint should respond quickly (for example `2xx`) and process the
payload in the background if needed.
## Configure webhooks
You configure the webhook **once per partner**; you do not pass the URL on every
`POST /analysis/start`.
### From the dashboard
Navigate to **Channels > API** and select the **Webhooks** tab.
Provide an HTTPS URL where Ochy will send POST requests. For example:
`https://your-app.com/webhooks/ochy`.
Click **Save Webhook**. The webhook is enabled automatically.
The URL must use HTTPS. HTTP endpoints are not accepted.
Once configured, use the toggle switch to enable or disable delivery without removing the URL.
Click **Edit URL** to change the endpoint, then **Update Webhook** to save.
Click **Send Test Event** to send a sample payload to your endpoint. The dashboard displays the
HTTP status code and response latency so you can verify connectivity.
The test button is only available when the webhook is enabled. Toggle it on first if you need to
test.
### From the API
**`GET /webhook`** returns the stored `url`, `enabled`, and `updated_at` for your partner. If
nothing has been saved yet, the response body is an empty JSON object (`{}`).
```bash theme={null}
curl -s "https://partner-api.ochy-prod.com/webhook?apiKey=YOUR_API_KEY"
```
Use **`PUT /webhook`** with a JSON body:
```json theme={null}
{
"url": "https://client.example.com/webhooks/ochy",
"enabled": true,
"signature": {
"enabled": true
}
}
```
| Field | Type | Description |
| ------------------- | ------- | -------------------------------------------------------------------- |
| `url` | string | HTTPS URL that will receive `POST` requests from Ochy. |
| `enabled` | boolean | When `false`, no webhook traffic is sent until you enable it again. |
| `signature.enabled` | boolean | Optional. When `true`, Ochy signs webhook requests with HMAC-SHA256. |
A successful **`PUT`** returns the same shape as **`GET`**: `url`, `enabled`, and `updated_at`.
If you enable signatures for the first time, the response also includes a `signature.secret`.
Copy and store it immediately; it is not returned by `GET /webhook`.
Example response when a signing secret is generated:
```json theme={null}
{
"url": "https://client.example.com/webhooks/ochy",
"enabled": true,
"updated_at": "2026-06-29T13:25:17Z",
"signature": {
"enabled": true,
"algorithm": "HMAC-SHA256",
"last4": "n6p8",
"created_at": "2026-06-29T13:25:17Z",
"updated_at": "2026-06-29T13:25:17Z",
"secret": "YOUR_GENERATED_SIGNING_SECRET"
}
}
```
Store `signature.secret` securely. Ochy only returns the full signing secret when it is generated
or rotated.
When `notify_via_webhook` is `true` on start, the API checks that your partner webhook is valid
and enabled. The decision to send webhooks for that analysis is fixed at start time and stored with
the analysis.
## Start an analysis with webhooks
Add an optional field to the same multipart request you already use for `POST /analysis/start`:
| Field | Type | Default | Description |
| -------------------- | ------- | ------- | -------------------------------------------------------------------------------------------------------------- |
| `notify_via_webhook` | boolean | `false` | If `true`, progress and completion events are delivered to your configured webhook URL for this analysis only. |
Example (cURL):
```bash theme={null}
curl -X POST "https://partner-api.ochy-prod.com/analysis/start?apiKey=YOUR_API_KEY" \
-F "video=@runner_side.mp4" \
-F "analysis_type=side_view" \
-F "notify_via_webhook=true"
```
## Events and payload format
For each analysis, events are emitted when:
* processing **starts** (status moves to `analyzing`);
* **progress** crosses each **10%** boundary from 10% through 90% (if progress jumps, all crossed
milestones are sent in order);
* the analysis **completes** successfully (`success`, 100%);
* the analysis **fails** (`failed`), at any progress value.
| `event_type` | Typical `status` | Notes |
| -------------------- | ---------------- | ------------------------------------------------------------ |
| `analysis.started` | `analyzing` | First processing signal for the run. |
| `analysis.progress` | `analyzing` | Progress milestones at 10%, 20%, … 90%. |
| `analysis.completed` | `success` | Final success; `percentage` is 100. |
| `analysis.failed` | `failed` | Terminal failure; `percentage` reflects last known progress. |
Ochy sends **`POST`** requests to your webhook URL with a JSON body like:
```json theme={null}
{
"analysis_id": "abc123",
"event_type": "analysis.progress",
"status": "analyzing",
"percentage": 40,
"sequence": 5,
"timestamp": "2026-03-23T10:45:00Z"
}
```
| Field | Description |
| ------------- | ---------------------------------------------------------------------------------------- |
| `analysis_id` | Same identifier as `video_id` from the start endpoint. |
| `event_type` | One of `analysis.started`, `analysis.progress`, `analysis.completed`, `analysis.failed`. |
| `status` | Current analysis status (`analyzing`, `success`, or `failed`). |
| `percentage` | Progress from 0 to 100. |
| `sequence` | **Per-analysis** monotonic counter. Use it to order and deduplicate events. |
| `timestamp` | Time of the event in UTC (ISO 8601). |
**Completed:**
```json theme={null}
{
"analysis_id": "abc123",
"event_type": "analysis.completed",
"status": "success",
"percentage": 100,
"sequence": 11,
"timestamp": "2026-03-23T10:46:30Z"
}
```
**Failed:**
```json theme={null}
{
"analysis_id": "abc123",
"event_type": "analysis.failed",
"status": "failed",
"percentage": 60,
"sequence": 7,
"timestamp": "2026-03-23T10:46:30Z"
}
```
## Verify webhook signatures
Webhook signatures are optional but recommended for production integrations. Enable them from the
dashboard or with `signature.enabled: true` in `PUT /webhook`. When signatures are enabled, Ochy
adds two HTTP headers to every webhook request:
| Header | Description |
| ------------------ | -------------------------------------------------------------- |
| `X-Ochy-Timestamp` | Unix timestamp in seconds, generated when the request is sent. |
| `X-Ochy-Signature` | Hex-encoded HMAC-SHA256 signature. |
The signed value is:
```text theme={null}
.
```
To verify a webhook:
1. Read the raw request body bytes exactly as received.
2. Read `X-Ochy-Timestamp` and `X-Ochy-Signature`.
3. Reject old timestamps (for example, more than 5 minutes away from your server time).
4. Compute `HMAC-SHA256` with your webhook signing secret over `.`.
5. Compare the expected signature with `X-Ochy-Signature` using a constant-time comparison.
Do not parse and re-serialize the JSON before verifying the signature. JSON whitespace or key
ordering changes will produce a different signature. Verify against the raw request body.
### Python example
```python theme={null}
import hashlib
import hmac
import time
def verify_ochy_webhook(secret: str, timestamp: str, signature: str, raw_body: bytes) -> bool:
# Reject replayed requests. Adjust the tolerance to your infrastructure.
if abs(time.time() - int(timestamp)) > 300:
return False
signed_payload = timestamp.encode("utf-8") + b"." + raw_body
expected = hmac.new(
secret.encode("utf-8"),
signed_payload,
hashlib.sha256,
).hexdigest()
return hmac.compare_digest(expected, signature)
```
### Node.js example
```js theme={null}
import crypto from "crypto";
function verifyOchyWebhook(secret, timestamp, signature, rawBodyBuffer) {
const ageSeconds = Math.abs(Date.now() / 1000 - Number(timestamp));
if (ageSeconds > 300) {
return false;
}
const expected = crypto
.createHmac("sha256", secret)
.update(`${timestamp}.`)
.update(rawBodyBuffer)
.digest("hex");
return crypto.timingSafeEqual(
Buffer.from(expected, "hex"),
Buffer.from(signature, "hex")
);
}
```
## Rotate the signing secret
Use **`POST /webhook/signature/rotate`** to generate a new signing secret:
```bash theme={null}
curl -X POST "https://partner-api.ochy-prod.com/webhook/signature/rotate?apiKey=YOUR_API_KEY"
```
The response includes the new `secret` once:
```json theme={null}
{
"enabled": true,
"algorithm": "HMAC-SHA256",
"last4": "7Tq2",
"created_at": "2026-06-29T13:25:17Z",
"updated_at": "2026-06-29T14:10:00Z",
"secret": "YOUR_NEW_SIGNING_SECRET"
}
```
Update your webhook receiver to use the new secret.
## Ordering and out-of-order delivery
Webhook delivery is asynchronous. In rare cases an older event might arrive after a newer one.
* Each payload includes a **`sequence`** that increases for that `analysis_id`.
* **Process events in `sequence` order**; if you receive a payload whose `sequence` is less than or
equal to the last one you applied for that analysis, you can **ignore** it.
Ochy also uses internal ordering so that events for a given analysis are published in sequence;
this reduces but does not eliminate the need for client-side ordering using `sequence`.
## Fallback: polling
You can always call:
```
GET /analysis/{analysis_id}/results
```
This endpoint continues to return the current status and percentage (and full results when
`status` is `success`), whether or not webhooks are enabled. Use it for integration testing,
manual checks, or when you need a single source of truth after delivery issues.
## Usage and credits
The remaining two tabs on the API page provide monitoring:
* **Usage** — view your API request history and consumption patterns.
* **Credits** — check your remaining analysis credits. Each analysis consumes one credit when
started (see [authentication](/authentication#credits)).
To add credits, contact sales through the [Ochy website](https://www.ochy.io) or from your account.
## See also
* [Analysis workflow](/guides/analysis-workflow) — video requirements, status codes, and polling
* [`GET /webhook`](/api-reference/webhooks/get-webhook) — read current webhook settings
* [`PUT /webhook`](/api-reference/webhooks/configure-webhook) — register or update your webhook URL
* [`POST /webhook/signature/rotate`](/api-reference/webhooks/rotate-webhook-signature) — rotate your webhook signing secret
* [`POST /analysis/start`](/api-reference/analysis/start-analysis) — `notify_via_webhook` field